Siemens PLC Programming | New PLC and HMI Project in TIA Portal v16
Introduction to Siemens Programmable Logic Controllers
Siemens is a world class manufacturer of various industrial hardware and software. The company has a market foothold in Europe and is growing in popularity in North America. Our goal is to introduce our readers and viewers to various PLC and HMI platforms and give them an option to decide what’s the best solution for their manufacturing operations.
In this article, we’re kicking off a series of tutorials on how to build a project in TIA Portal. We’ll be covering how to build your first project, how to configure PLC and HMI tags, how to establish communications to actual hardware and a simulator, how to write simple programs and download them onto the PLC.
Siemens PLCs - S7-1200 and S7-1500 Starter Kits
The question we’ve received on a number of our content around the series is “how can I get started?”. Siemens provides a convenient way to purchase a Starter Kit that includes everything you need to get hands-on experience with the platform.
The two options available are an S7-1200 series PLCs and the S7-1500 series PLCs. It’s important to note that Siemens has other lines, but for the purposes of these tutorials and ease of following what we cover, we recommend that you stick to those two.
The S7-1200 series PLCs are designed with smaller machines in mind. They are an inexpensive way to deploy a local control scheme, program a simple automated process and to send data upstream. The S7-1500 series of PLCs is much more powerful. It has more memory, additional compatibility with advanced servo drives and a faster processor. If you’re looking to control an entire line, multiple assets, or a small production facility, the S7-1500 is the way to go.
To purchase a Siemens Starter Kit, you’ll have to go through a local distributor or an online vendor. To find a local distributor, use the following link:
Siemens Local Distributor Finder
An online vendor we’ve had good reviews about is Allied Electric. See their catalog here:
Siemens Starter Kit Recommendations
You should be aware of the following when purchasing a kit:
- If you’re looking for the absolute lowest price, you can purchase a basic S7-1200 kit which includes access to TIA Portal.
- If you’re interested in programming an HMI, you can find multiple kits that come with different displays.
- If you’re interested in safety applications, pay attention to the PLC you’re receiving in the kit. Safety PLCs will come at a premium, but this feature can be disabled for non-safety applications until it is needed.
- You can learn how to program PLCs and HMIs through the S7-1200 kit and PLCSIM. We don’t recommend investing in an S7-1500 if you’re just looking to learn in a non-commercial setting. We recommend those kits if your plant is looking to migrate, has such systems deployed or can sponsor the purchase of these kits.
Building a Project in Siemens TIA Portal V16
In this section, we’re going to dive into creating our first project using Totally Integrated Automation Portal.
Step 1 - Install TIA Portal
TIA Portal is the software required for Siemens PLC programming.
TIA Portal Basic can be used for programming S7-1200 PLCs while TIA Portal Professional can be used for programming S7-300, S7-400, S7-1200, and S7-1500 PLCs.
[Optional] Step 2 - Install PLCSIM
PLCSIM is the software we will need in a later tutorial to simulate a virtual PLC.
Step 3 - Launch TIA Portal v16 (or V17 latest)
Step 4 - Select “Create a New Project”
- Step 4.1 - Give the project a name
- Step 4.2 - Choose a path of where to save the project
- Step 4.3 - Press on “Create”

Step 5 - Press on “Devices & Networks” in the left tab or the main window
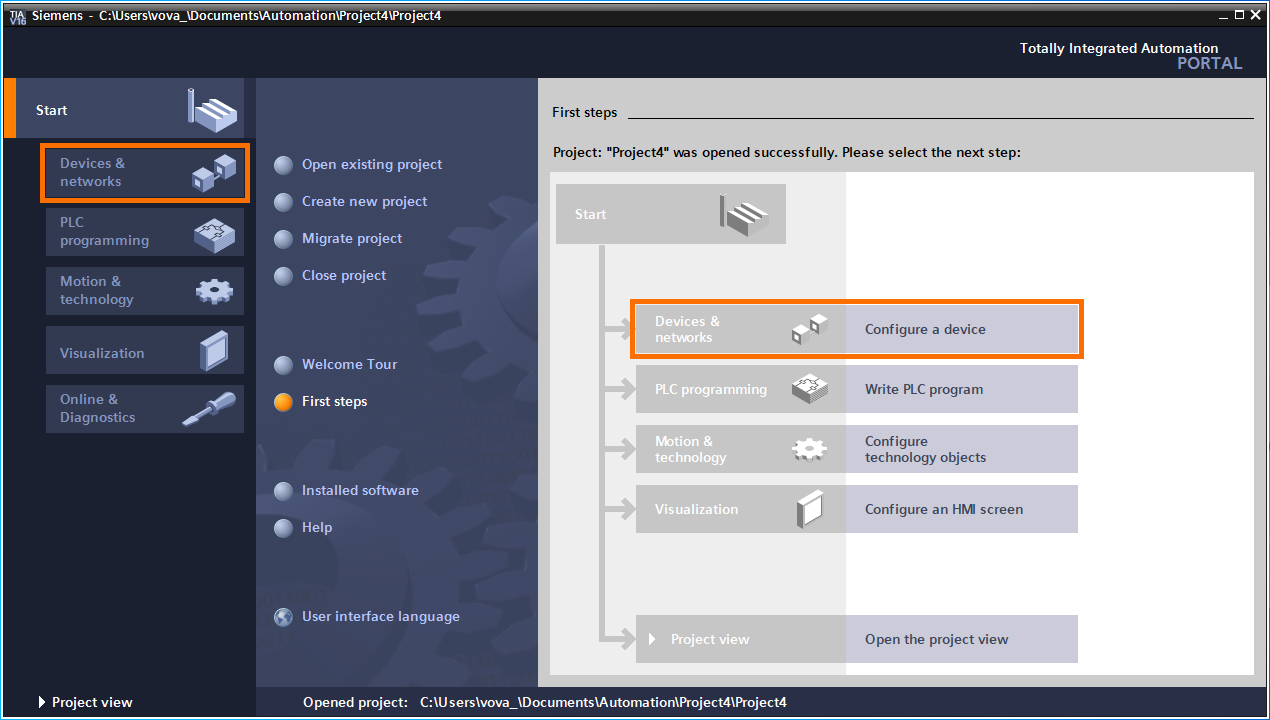
Note: There’s a way to add a device from “Project View”; we’ll look at this option when adding an HMI to the project.
Step 6 - Press on “Add new device”
In a blank project, you should see no devices under the “Show all devices tab”.
- Step 6.1 - Press on “Controllers”
- Step 6.2 - Select the Controller you wish to add to your project
Note: The example below is of an S7-1200 1212FC DC/DC/Rly Safety Controller.
- Step 6.3 - Select the appropriate firmware
Note: The latest firmware based on your version of TIA Portal will be selected by default.
- Step 6.4 - Press on “Add”
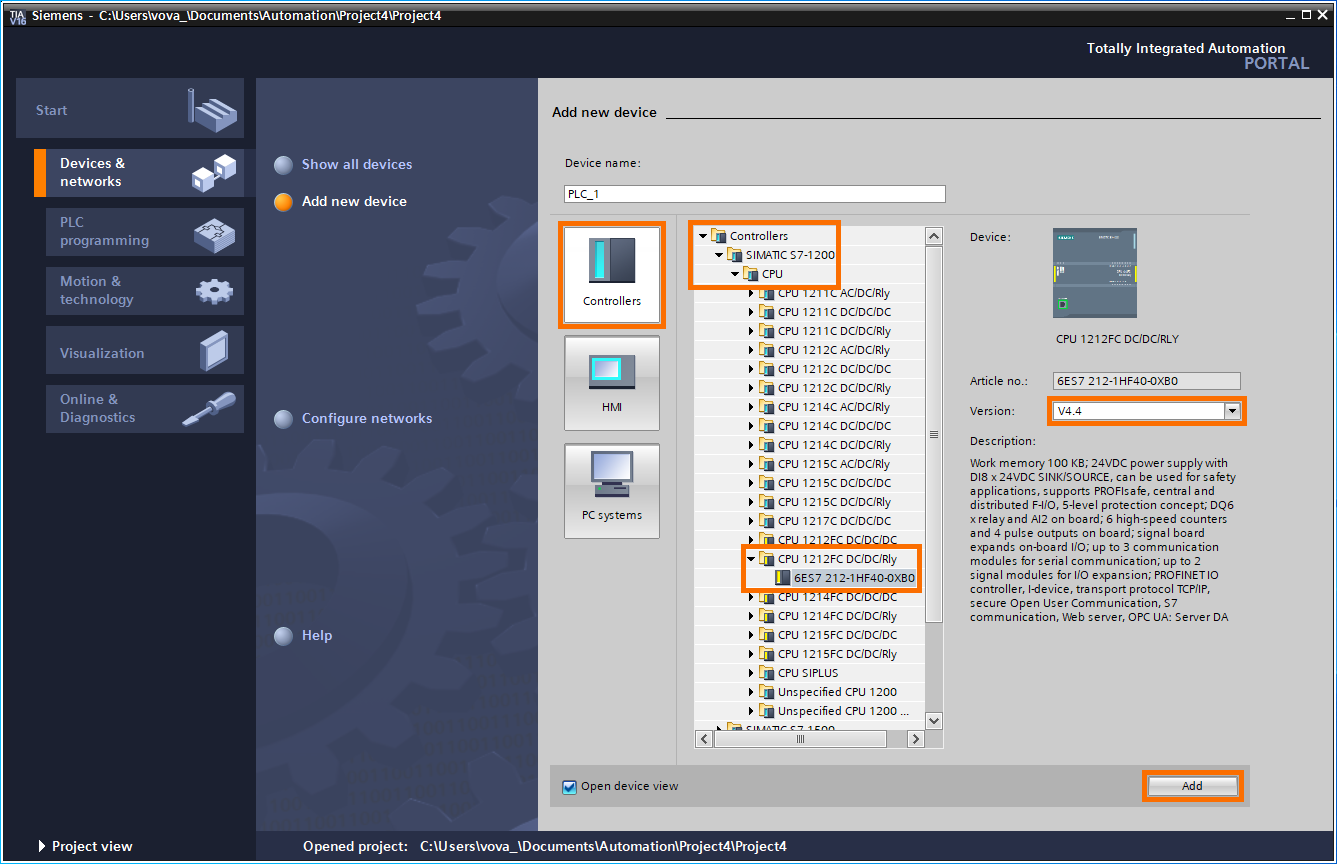
Step 7 - Double-Click on “Add new device”
- Step 7.1 - Select “HMI”
- Step 7.2 - Select the panel you wish to add
- Step 7.3 - Select the Firmware Version
- Step 7.4 - Press on “OK”
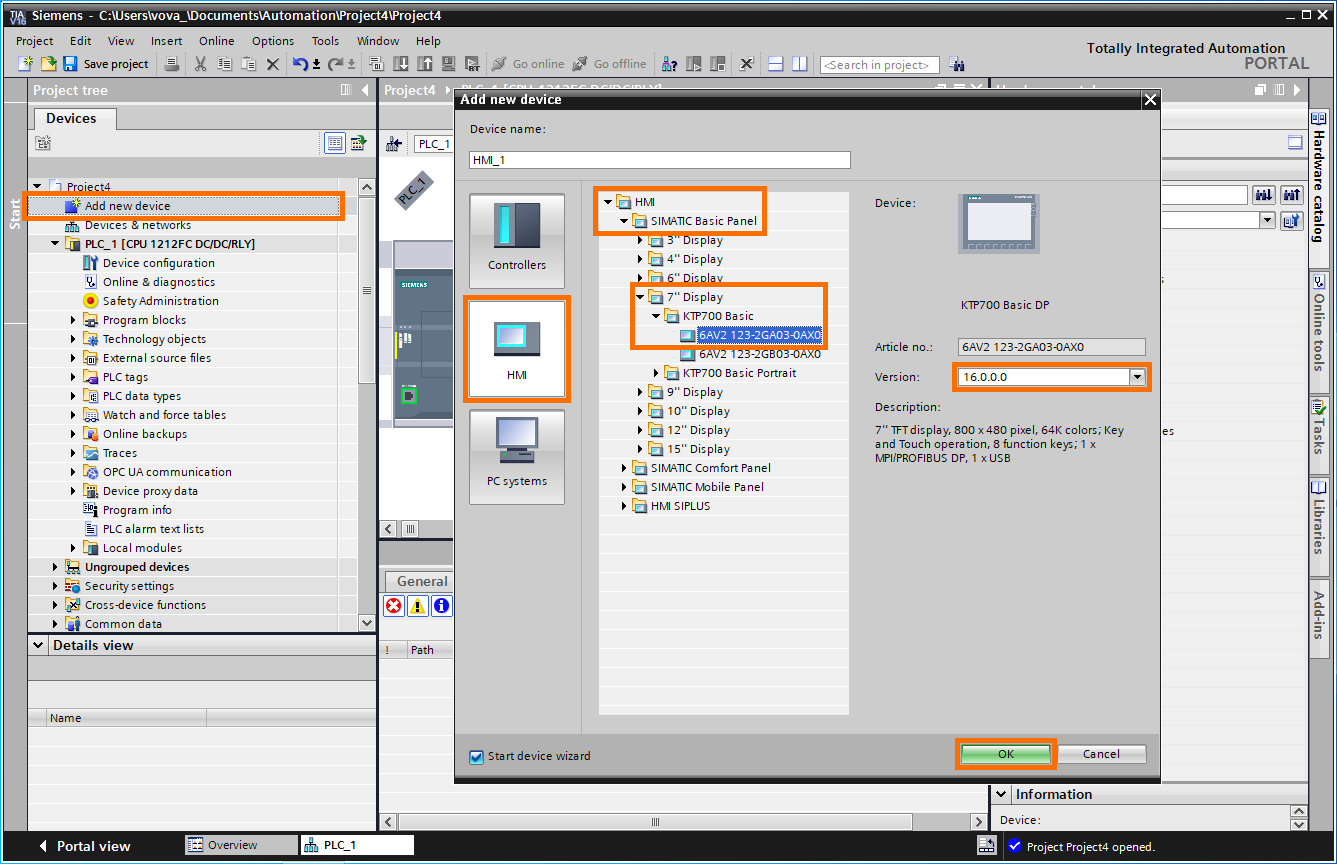
[Optional] Step 8 - Configure the HMI using the Wizard
Step 9 - Configure communications between the PLC and HMI
There are several ways you can establish a connection between a PLC and HMI through TIA Portal. The most straightforward way, that we will demonstrate in a future tutorial, is by adding tags onto the HMI screen. The software will recognize what the programmer is looking to achieve and creates an automatic connection. However, an interesting feature in TIA Portal over other software packages is the visual layout of various devices and connections between them. On this screen, the user can create new connections, remove existing ones and figure out which devices are connected onto the network.
- Step 9.1 - Open “Devices and networks”
- Step 9.2 - Open the “Connections” tab
- Step 9.3 - Drag and drop a connection between two EtherNet / ProfiNet ports
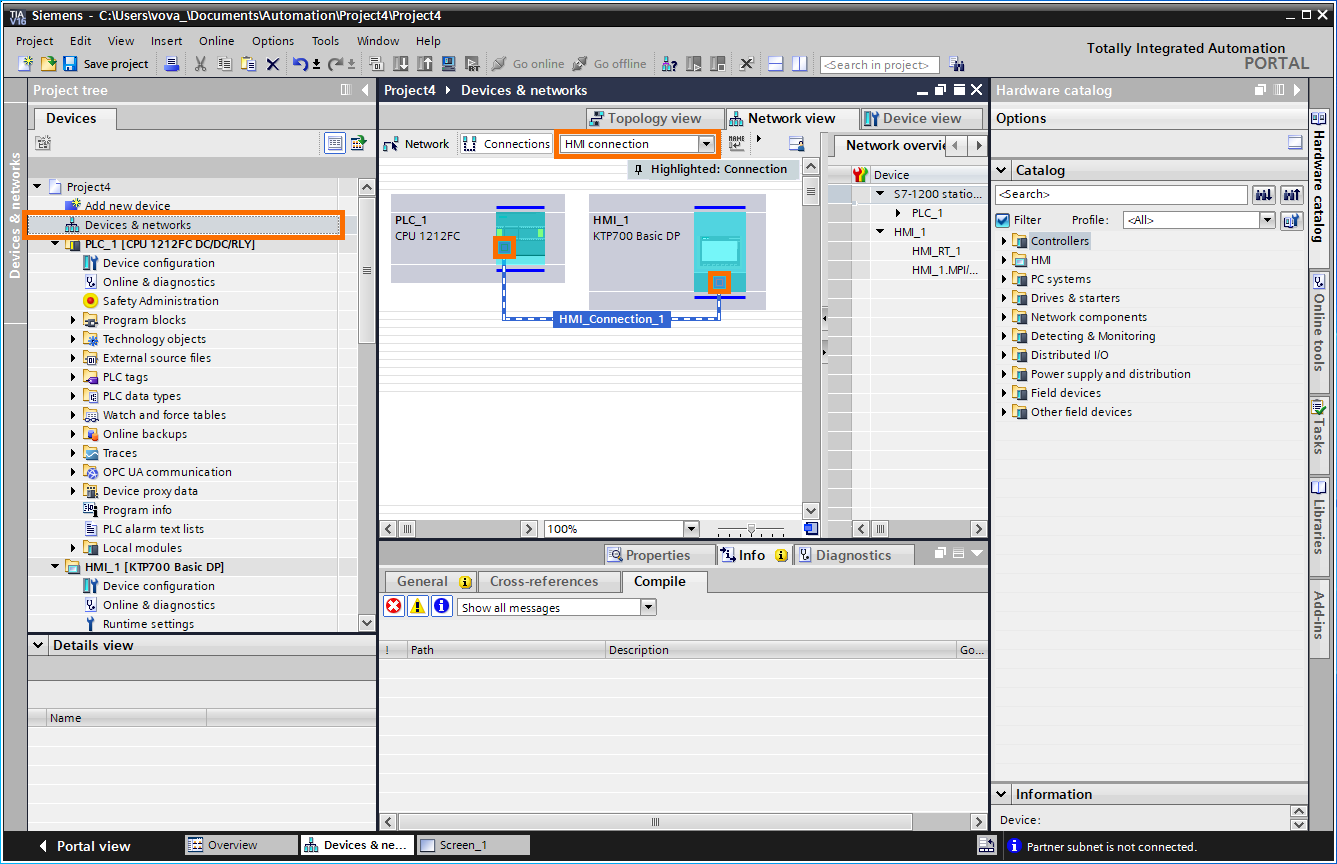
Step 10 - Configure the PLC
We need to configure the project in order to be able to go online with the PLC we have selected.
[Optional] Step 11 - Disable Safety
As mentioned above, we’re working with a safety based PLC. If your PLC does not support features or you’re not looking to disable these features, skip this step.
The safety disable is under the PLC, “Fail-Safe”.
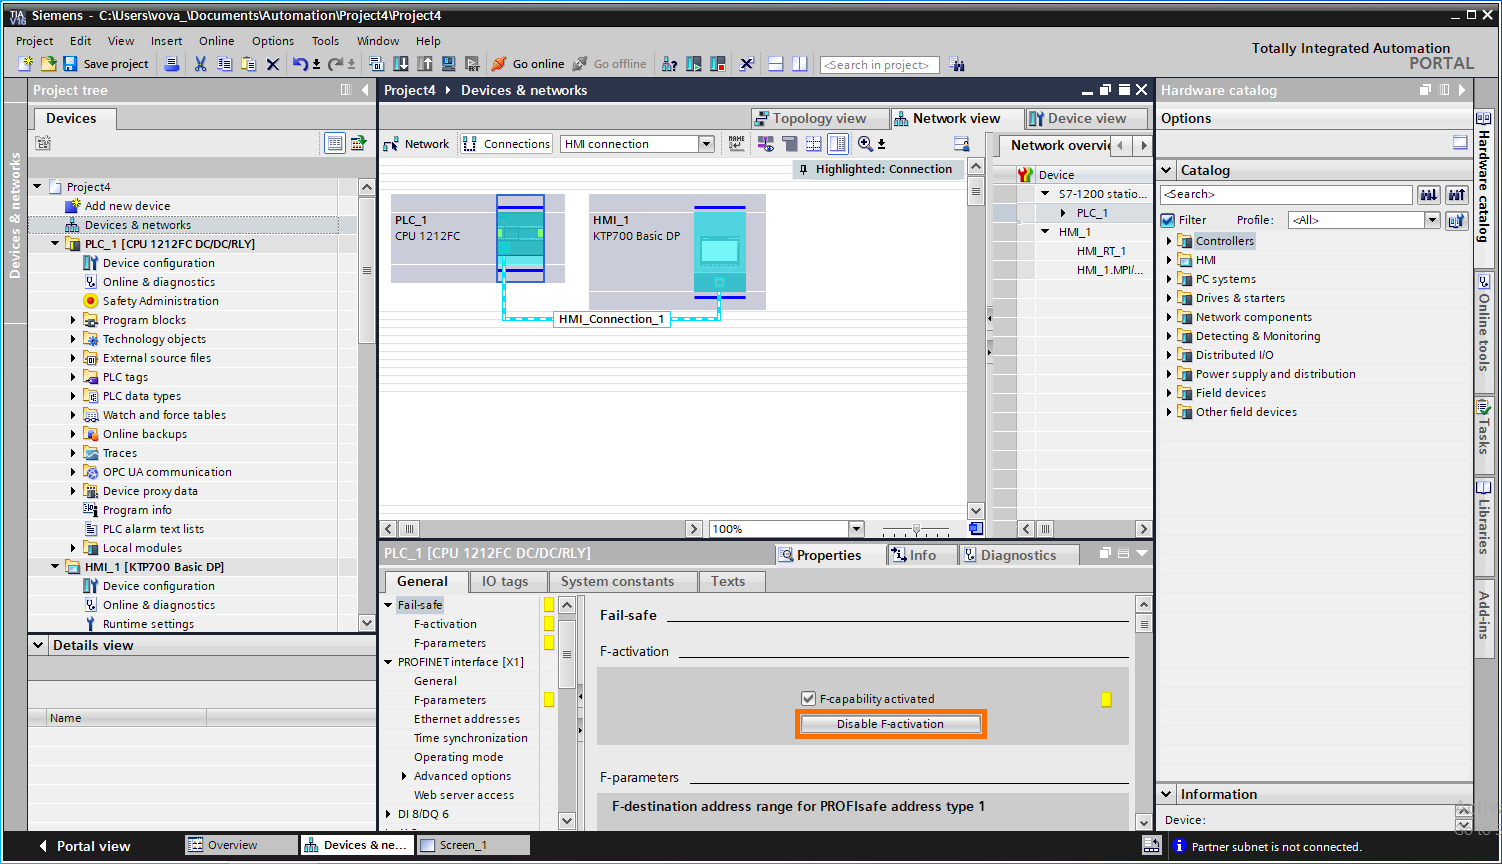
Note: You may only disable safety features before you go online with the processor.
Step 12 - Set the IP address of the PLC
- Step 12.1 - Open the PLC Configuration
- Step 12.2 - Open the “Ethernet addresses” tab
- Step 12.3 - Set the IP address of the PLC
Note: out of the box, the IP address of the PLC will not be set. You will connect using the MAC address in the following step.
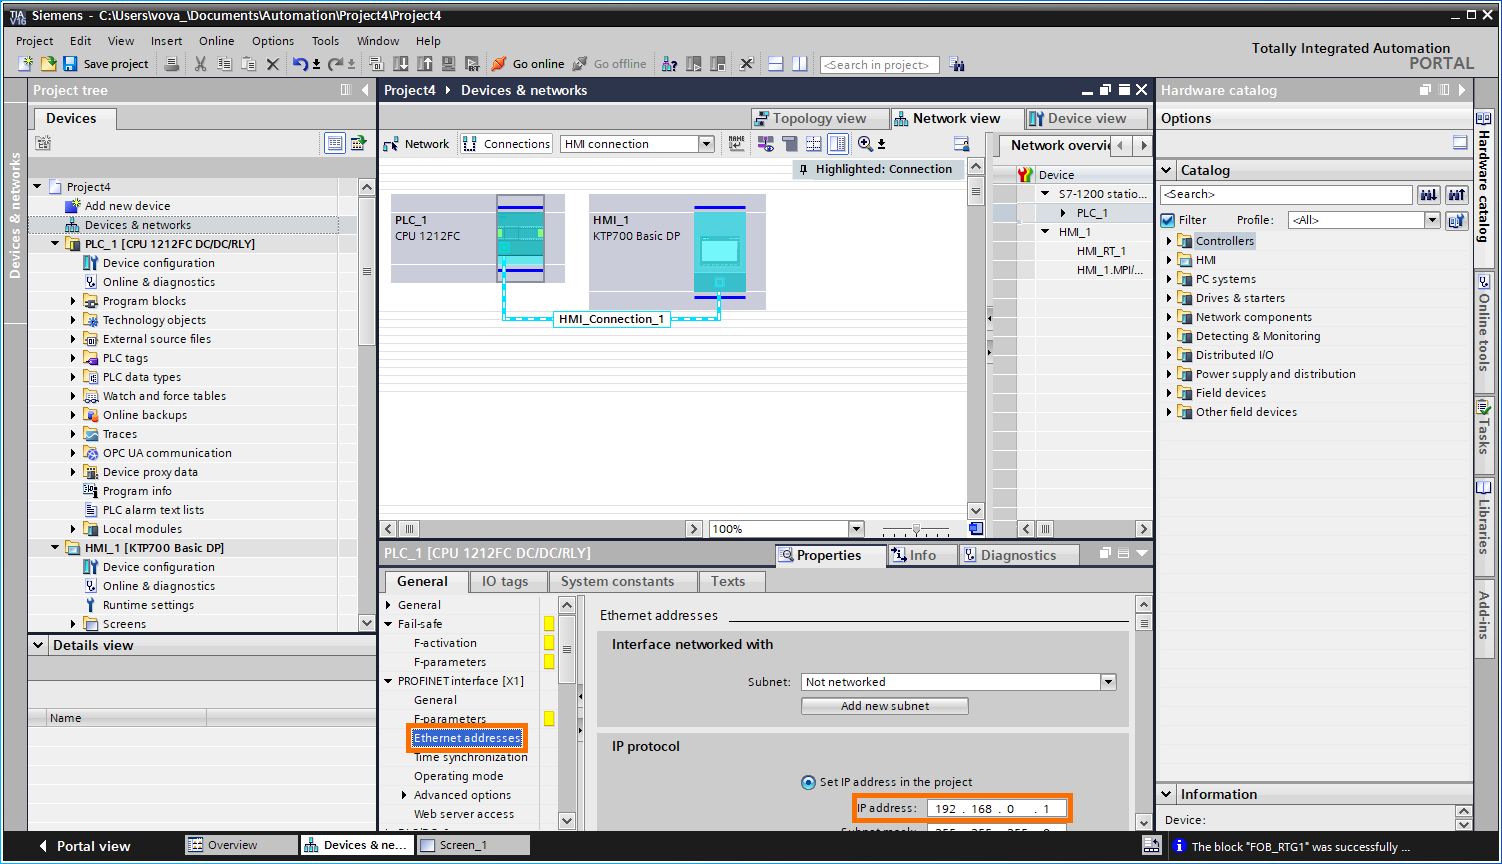
Step 13 - Press on “Go online”
Step 14 - Select the appropriate PG/PC Interface
Step 15 - Press on “Start Search”
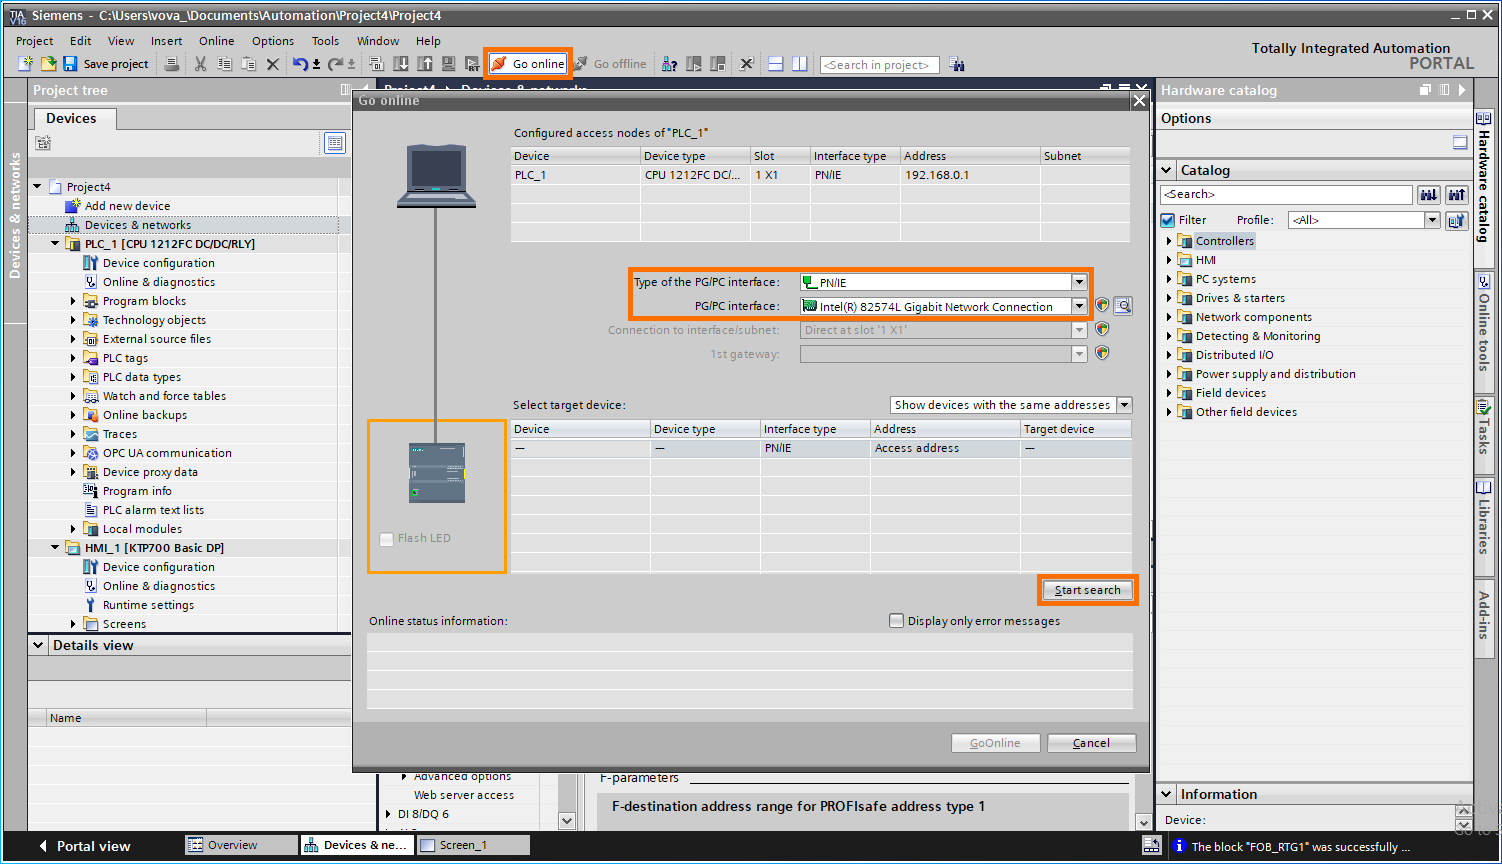
Step 17 - Select the device in the list
[Optional] Step 18 - Use the “Flash LED” checkbox to validate the right device has been selected.
Note: It is recommended that you perform this check in a production environment before going online every single time.

Step 19 - Download to Device
Once you’ve connected to the PLC, it’s possible that the program on the PLC is not the same as the one within the project. A blank project typically has a single empty rung.
To perform a download, expand the “Program blocks”, select “Main [OB1]” and press on “Download to device”.
Note: Alternatively, you may choose to download the program from the PLC into the project.
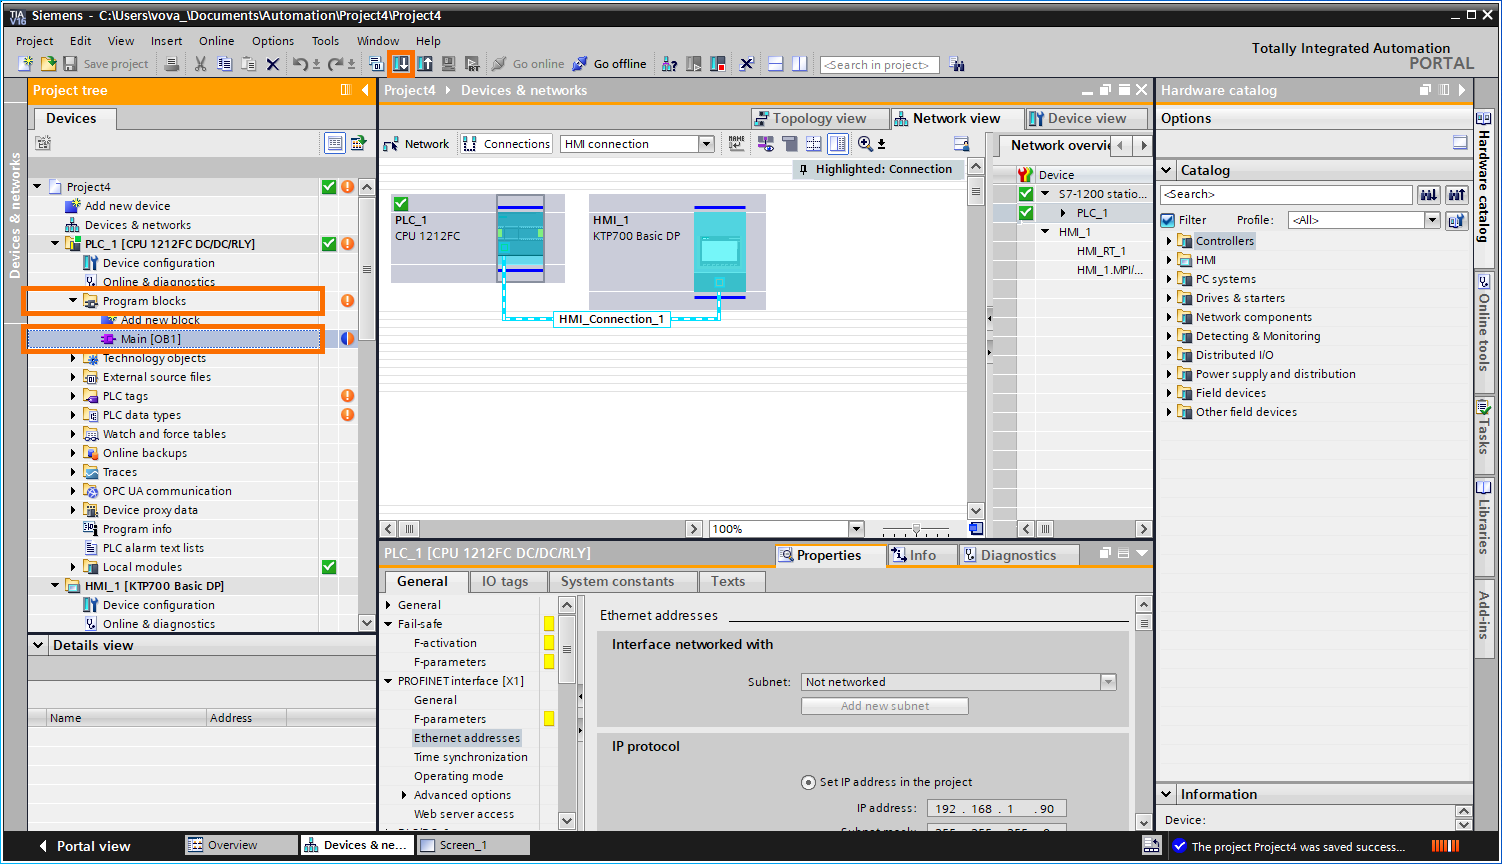
Step 20 - Resolve any Program Differences
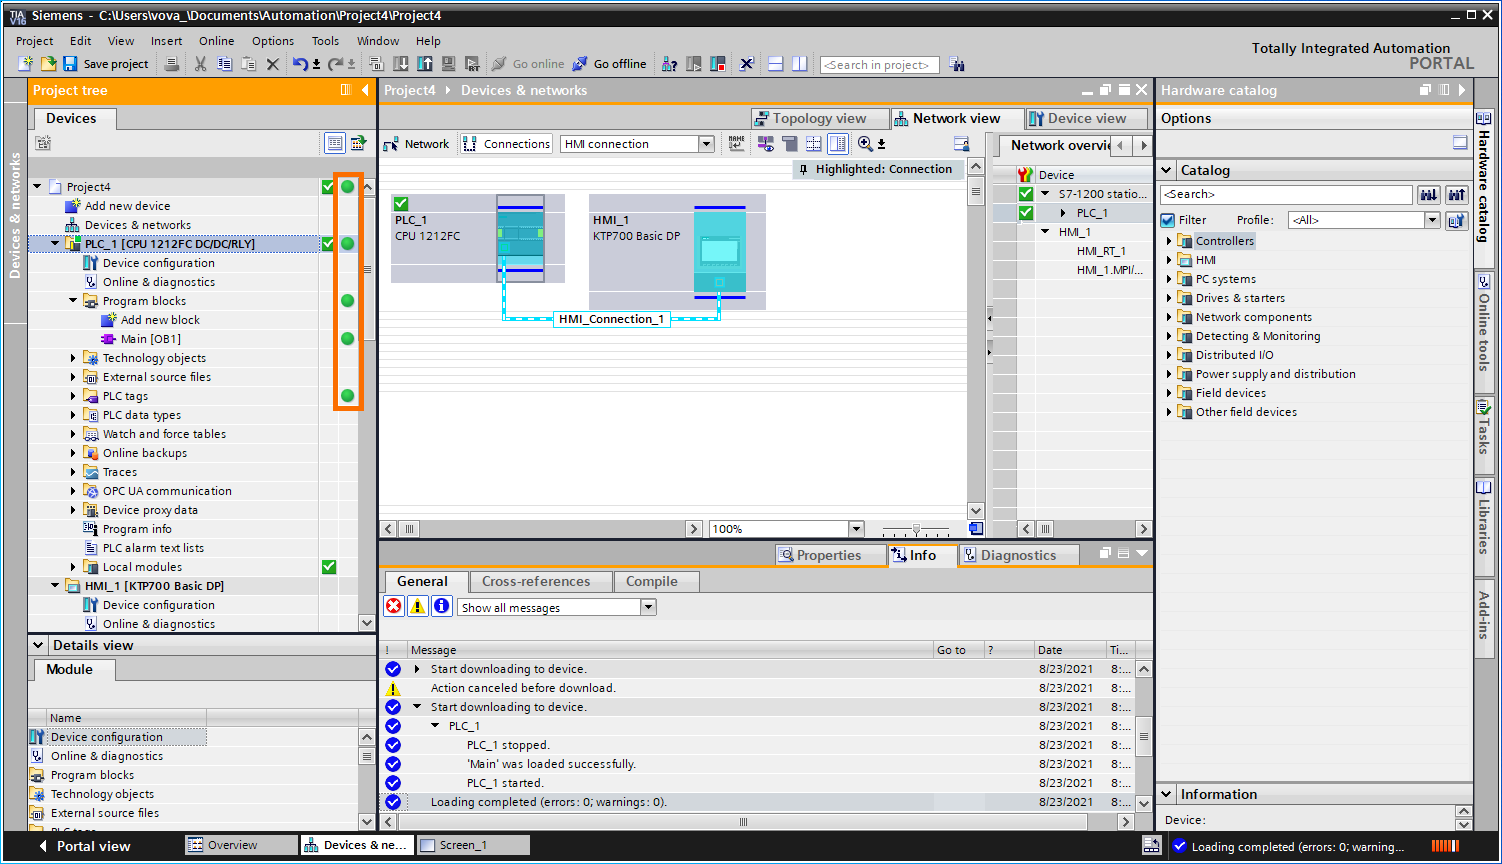
As you perform the download, the software will notify you of any issues it has encountered that you need to resolve to finalize the download. In most cases, the warnings can be resolved directly from the prompt and involve you making sure that you want to overwrite what is currently on the PLC if it is different than what’s in the project.
Once all the components are the same on the PLC and the project, you should see green checkboxes along the left tab within the project.
Conclusion on Siemens TIA Portal PLC Programming
In this tutorial, we’ve covered the steps necessary to create a new Siemens TIA Portal v16 project, configure a PLC and HMI into the project, and went online with a physical device. We’re currently working on a series of tutorials that will cover the following topics including building a small program, downloading logic to the PLC and simulating HMI tags.


