Ultimate Guide to WinCC Unified: Step-by-Step Tutorial for Modern Industrial Automation
Introduction
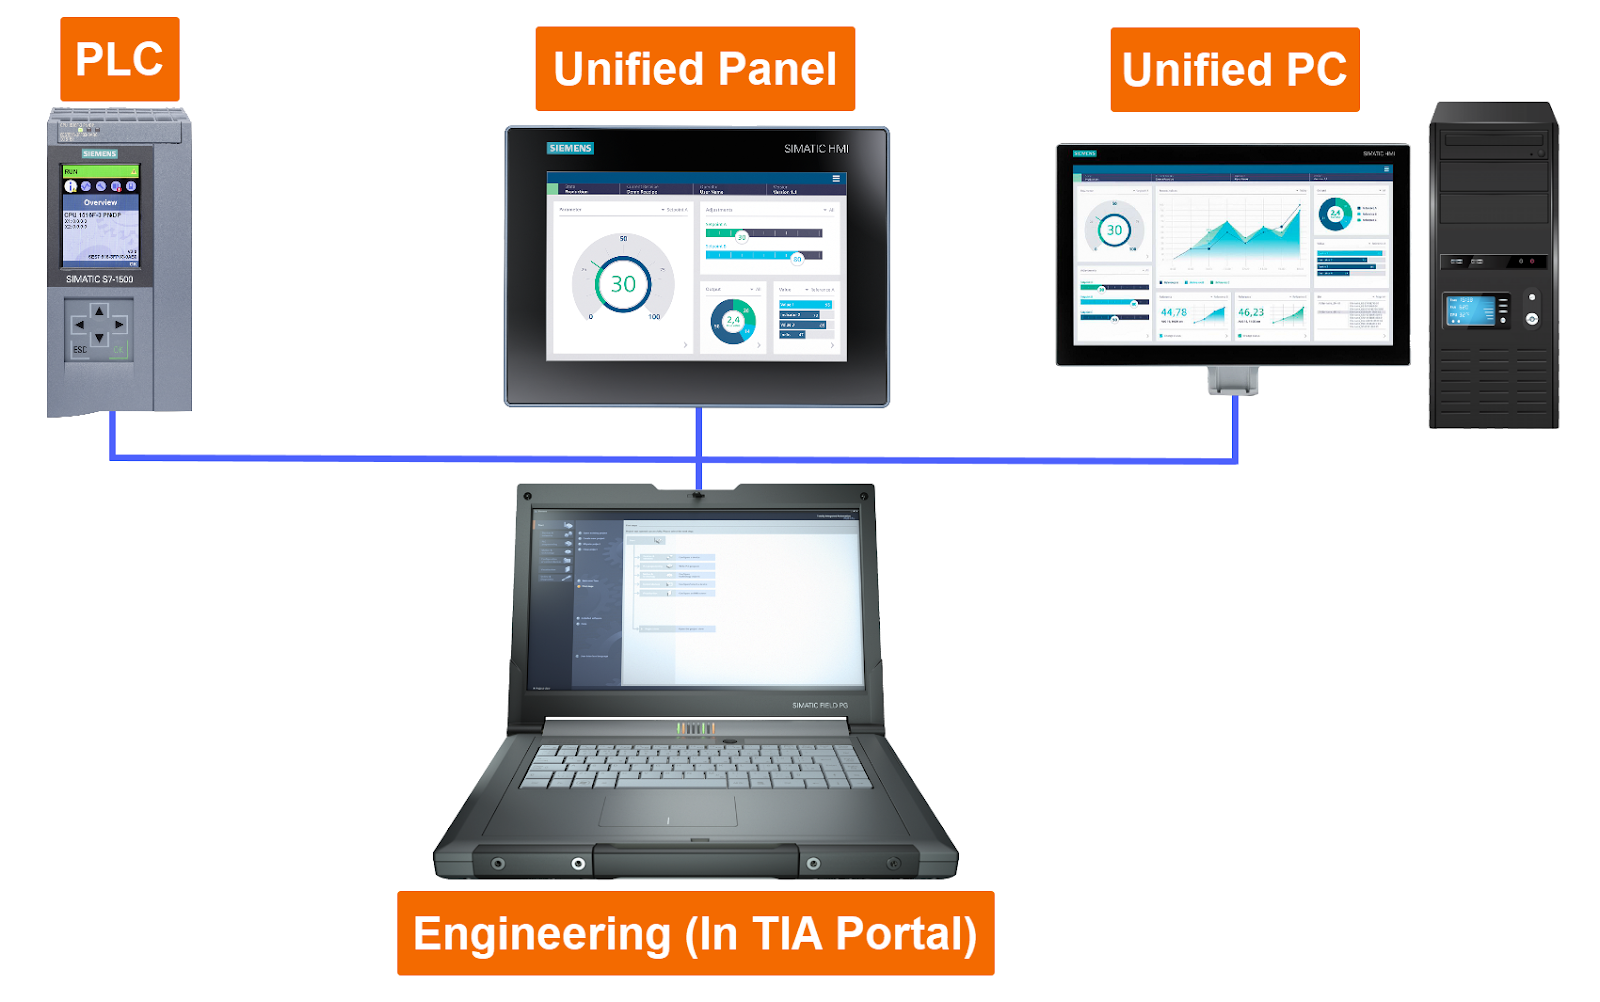
WinCC Unified represents a groundbreaking step in the evolution of industrial automation visualization. Built on modern web technologies, it provides unparalleled flexibility, scalability, and performance, making it a top choice for engineers and developers aiming to create seamless Human-Machine Interface (HMI) systems. Whether you’re working on a simple project or a complex automation system, WinCC Unified adapts to your needs with its user-friendly interface and robust features.
This platform not only supports native desktop applications but also enables web-based monitoring and control, ensuring accessibility from virtually anywhere. With its support for the latest industry standards and intuitive tools, WinCC Unified helps bridge the gap between innovation and practicality. Dive into this tutorial to explore why it’s a game-changer for modern automation projects.
Prerequisites
Prior familiarity with “Siemens HMI Programming | WinCC TIA Portal” and “An Introduction to Siemens Legacy HMI Programming” will prepare you to engage more effectively in this tutorial.
Creating a New Project
If you have just opened the TIA Portal and want to dive into WinCC Unified, you are in the right place. Let’s go step by step so you can get started with ease. By the end of this tutorial, you will feel confident handling this powerful industrial visualization software.

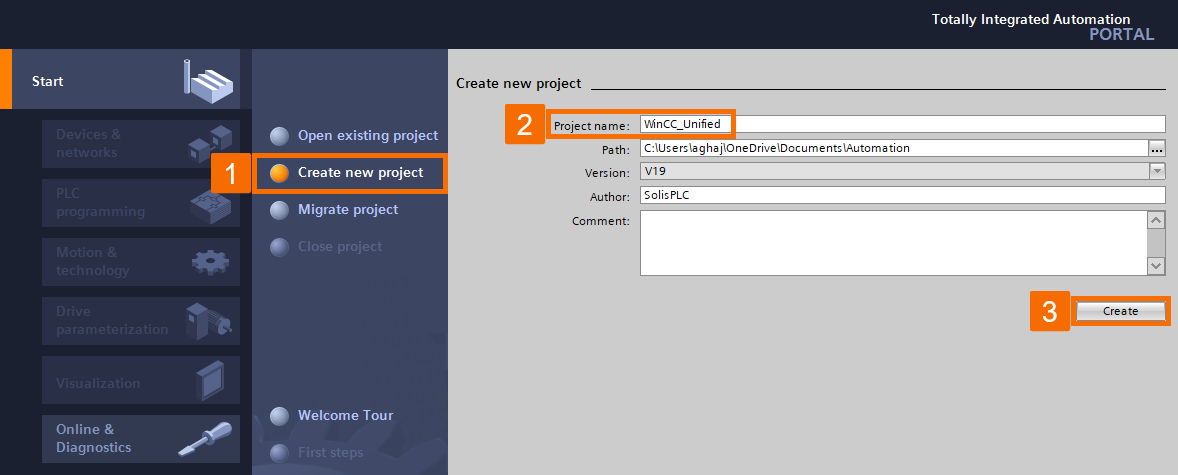
When you launch the TIA Portal, you will be notified of the welcome screen. From here, click on “Create new project.” Now, give your project a meaningful name—something descriptive to keep things organized. Once you have named it, click the “Create” button. That’s it! Your new project is born.
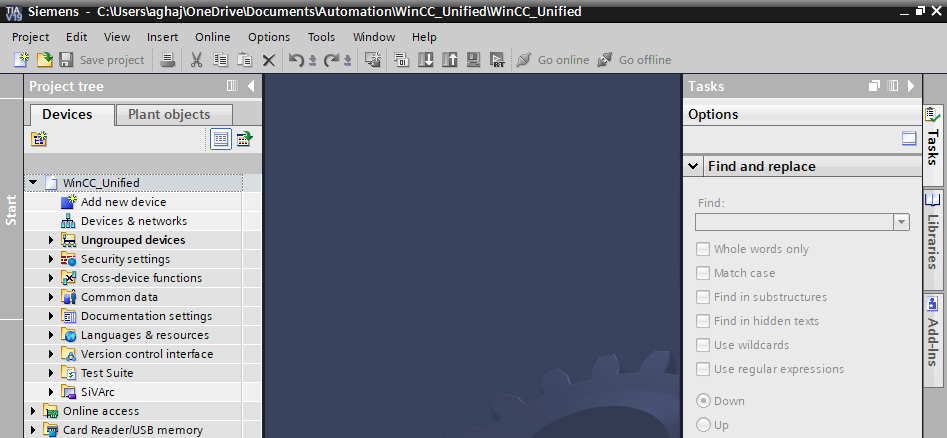
After creating your project, the “First Steps” window pops up. Here’s where you can choose to explore the interface. To get started with configuration, left-click on “Project view.”

This opens the environment where all the magic happens. This is your central hub for configuring devices, tags, screens, and more.
Adding a New Unified Device
In the “Project tree” (that vertical menu on the left side), locate “Add new device” and double-click on it. This opens the “Add device” window, where you can select the hardware for your project.
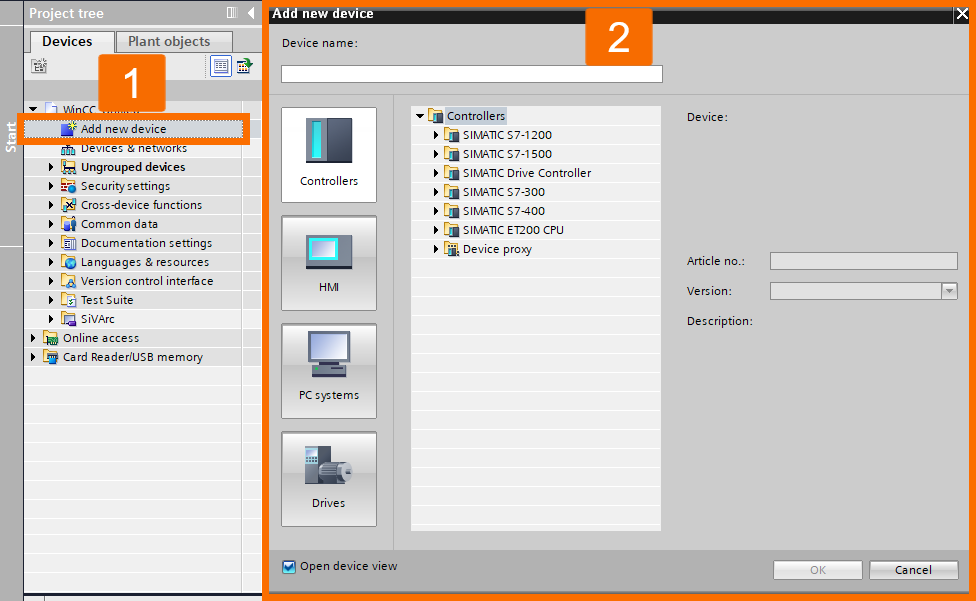
If you’re working with an HMI panel, select the “HMI” tab. Here, you’ll find options like “SIMATIC Unified Basic Comfort Panels” (4-inches to 12-inches displays) and “SIMATIC Unified Comfort Panels” (7-inches to 22-inches displays).
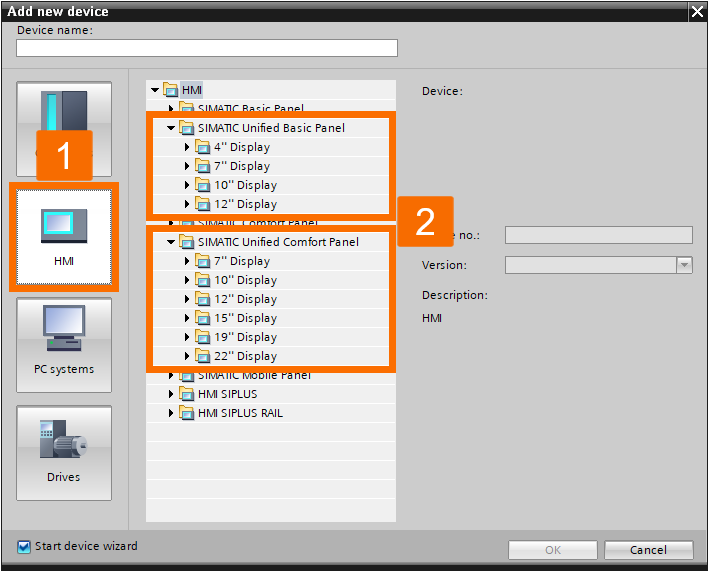
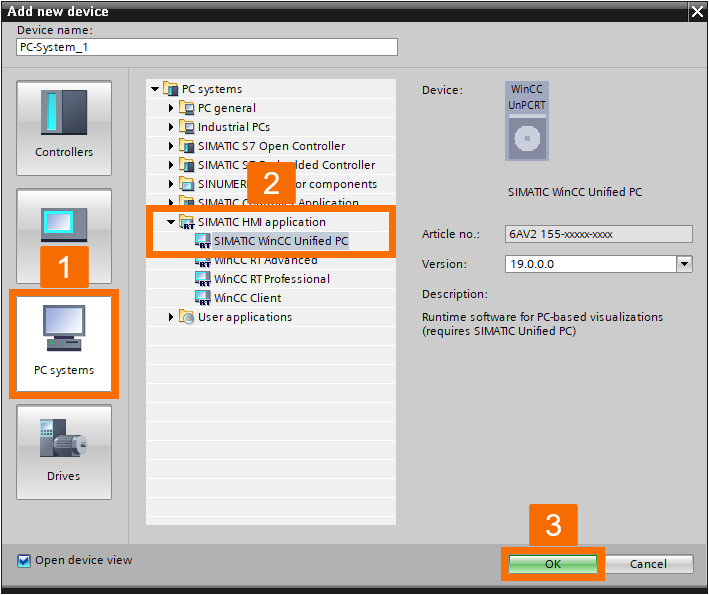
If you are using a PC-based system, select the “PC systems” tab. Expand the “SIMATIC HMI application” to see the option for “SIMATIC WinCC Unified PC.” Pick your desired device. In this tutorial, go ahead with the PC station. After selecting it, hit the “OK” button to add it to your project.
Customizing Your Device Name
Personalizing your device names is a great way to keep everything clear. Right-click on your new PC station in the “Project tree,” choose “Rename,” and type your desired name.
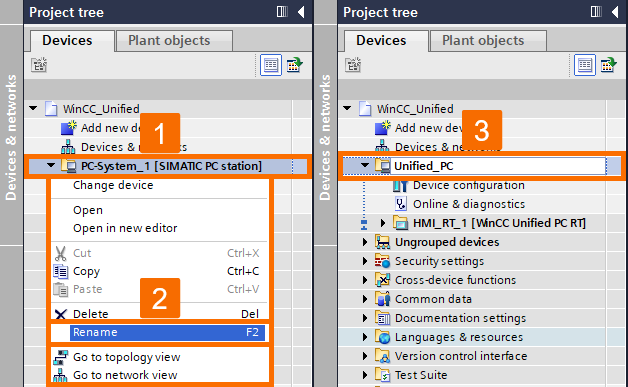
Want to rename the “Unified Runtime” too? No problem! Use the same method to keep things consistent.

Creating an Internal Tag
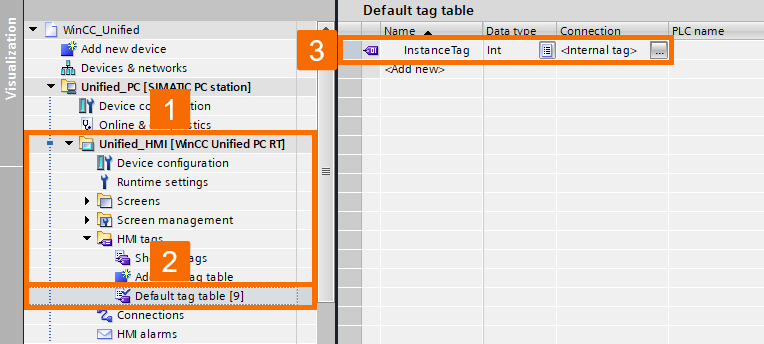
Let’s dive into tags. Expand your “Unified_HMI” folder in the “Project tree,” then expand “HMI tags.” Double-click on the “Default tag table” to open it. Here is where you add new tags. Click over the “<Add new>” in the table, give your tag a name, and select its data type. For example, choose “Int” if you want an integer tag. Tags are the backbone of your project, connecting objects to data.
Adding a Main Screen
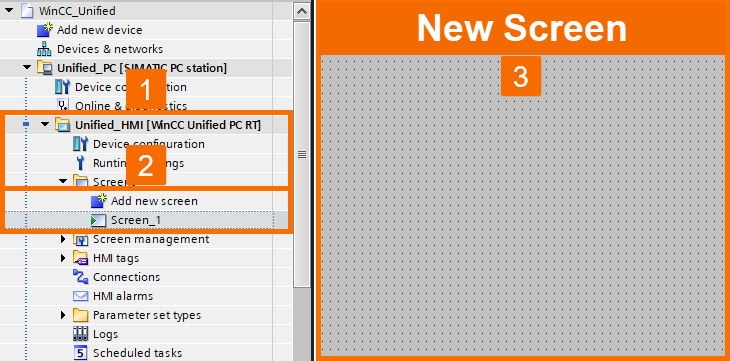
Under the “Screens” folder in the “Project tree,” double-click on “Add new screen” to create a screen. Screens are the visual heart of your project. Screens are what users see and interact with.
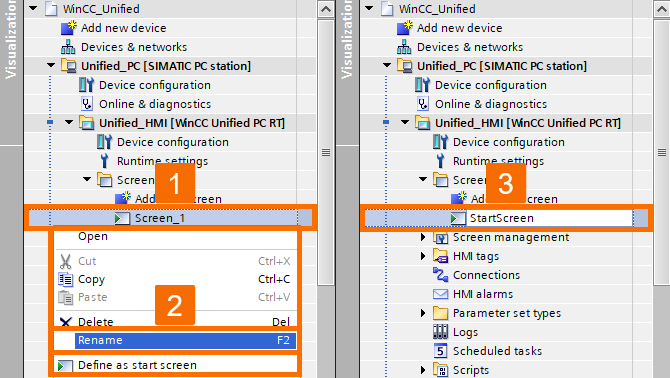
Like before, you can rename your screen by right-clicking on its name, selecting “Rename,” and typing something that makes sense for your project.
Linking Tags to Objects
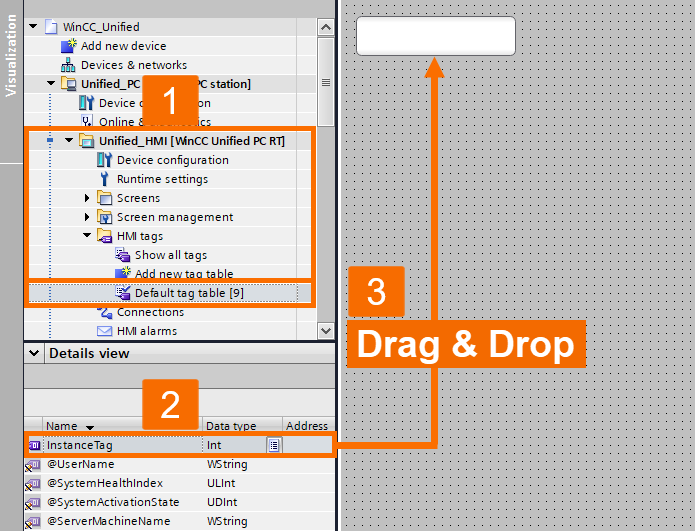
Once again, navigate to your “Default tag table,” find your newly created tag, and drag it onto your screen.
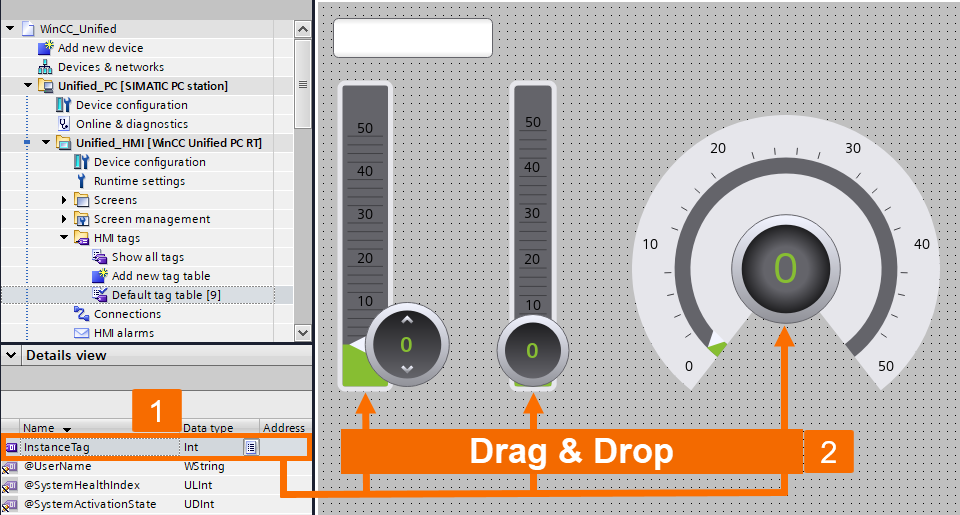
Now for the fun part. On the right side of the TIA Portal, open the “Toolbox” task card. Expand the “Elements” section to find graphic widgets like sliders, bars, and gauges. Drag these objects onto your screen.

Once they are in place, link each object to your tag by dragging the internal tag onto them. This way, your slider or gauge will be tied to data.
Adjusting Runtime Settings
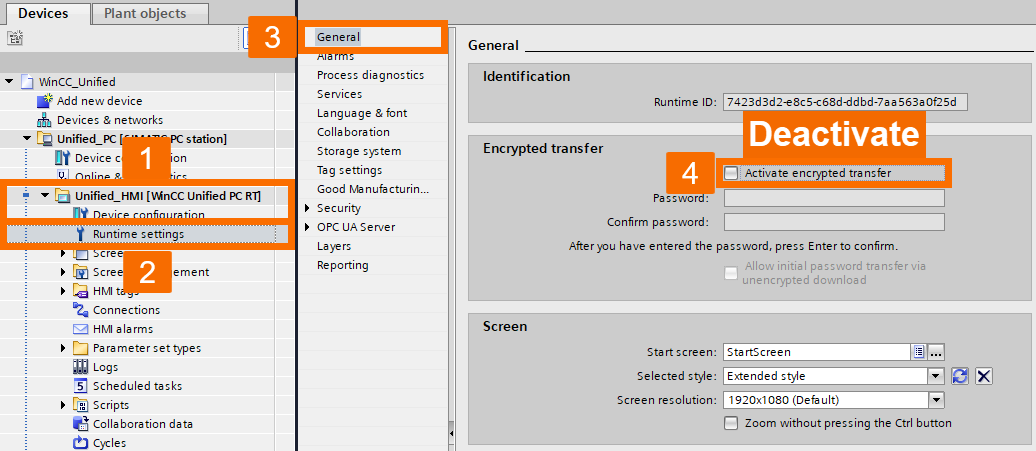
Let’s tweak the runtime settings. Under “Unified_HMI,” double-click on “Runtime settings.” Navigate to the “General” section and locate the “Encrypted transfer” settings. Deactivate the encrypted transfer option. Don’t worry. This step setting was already handled during the “WinCC Unified Configuration.”
Prepping for Simulation
Before jumping into the simulation, it’s vital to check your settings. From the top toolbar, click “Settings” under the “Options” menu.

Once the settings window opens, go to the “HMI simulation” section under the “Simulation” item. You will notice an option for “Show load preview.” If this box is checked, uncheck it. Why? Because if it is checked, the simulation won’t open in a browser tab, which is less convenient. Unchecking it ensures a smoother experience.

Running the Simulation
Now is the time to see your project in action! Select your Unified PC station in the “Project tree,” then click the “Start simulation” icon on the top toolbar.

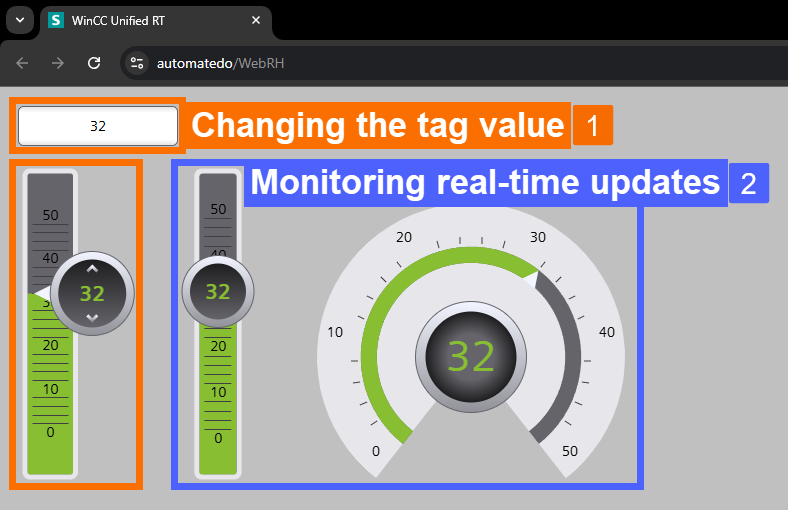
The simulation compiles and launches in a new browser tab. In this tab, you will see your PC station’s name and can interact with your tags and objects.

Change the tag value, adjust the slider, and watch the real-time updates. This is where WinCC Unified shines, offering a seamless experience for testing and debugging your project.
Switching Devices
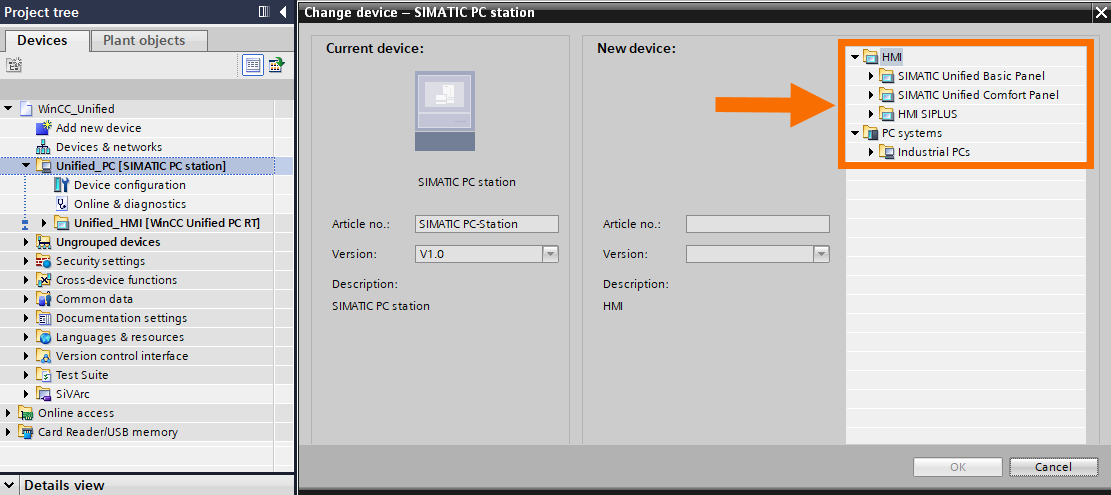
What if you want to switch from a Unified PC system to a Unified HMI panel or vice versa? WinCC Unified makes it easy. Right-click on your existing Unified device in the “Project tree” and select “Change device.”

In the “Change device” window, you can choose a new device from “Unified Basic Panels,” “Unified Comfort Panels,” “SIPLUS HMI Panels,” and “PC systems (general or industrial).”
After selecting your new device, click “OK.”
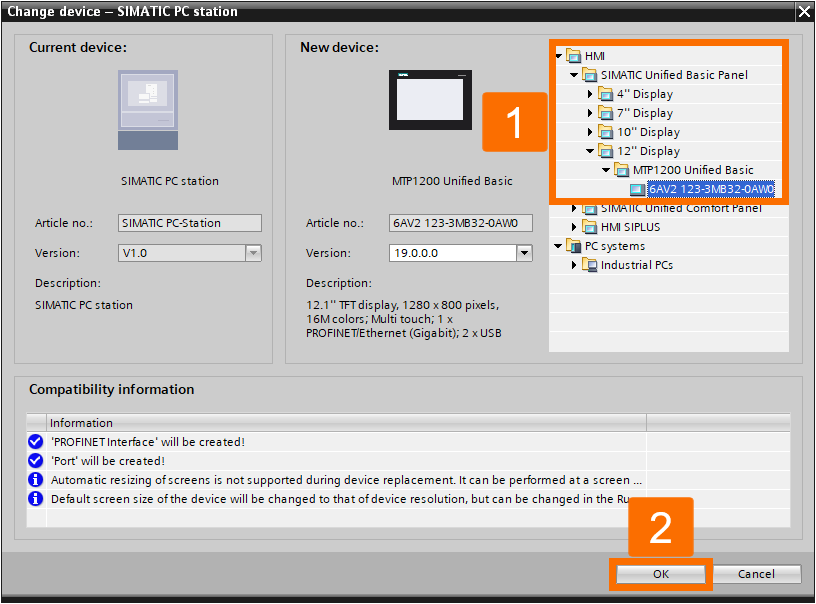
Most of your project’s screens and settings will remain intact, making the transition seamless.

Tips for a Smooth Workflow
Consider a few best practices to streamline your workflow as you work through your project. Saving your work frequently ensures no progress is lost in case of an unexpected issue. Clear and descriptive naming conventions for tags, screens, and devices help you stay organized, especially in larger projects. Testing at every stage of development is crucial. Running simulations early and often allows you to catch potential problems before they become more significant issues.
Conclusion
In conclusion, this tutorial has guided you through the essential steps for working with WinCC Unified, from creating a new project to running simulations and switching devices. You have learned how to add and customize Unified devices, create internal tags, design interactive screens, and link data to visual objects. These skills are the foundation for building dynamic and efficient Human-Machine Interface (HMI) systems tailored to modern industrial automation needs.
The WinCC Unified is known for its flexibility, allowing seamless transitions between HMI panels and PC-based systems. This adaptability ensures that your projects evolve with changing requirements without losing core functionality. Additionally, the browser-based simulation environment offers efficient ways to test and troubleshoot designs, saving time and resources during development.
By following this tutorial, you’ve also been introduced to best practices such as maintaining clear naming conventions, testing regularly, and organizing your project effectively. These habits are crucial for managing complex automation systems and ensuring long-term project success.


