RSLogix 5000 Tag Structure - Creating Alias Tags for PLC Input Output Modules Point IO Studio 5000
Introduction
Tag aliasing is a concept which is particularly important in RSLogix 5000. The reason is that most RSLogix 5000 based Programmable Logic Controllers (PLCs) aren’t able to save tag descriptions within their memory. If the program is lost & needs to be uploaded from the controller, it will be restored without a single description. However, if you’re working with Studio 5000 v21 or above, your PLC will most likely have the capability to store the descriptions you add into your program.
In short, we’d recommend using tag descriptions in Studio 5000 and tag aliasing in RSLogix 5000. This ensures that you have a meaningful comment about the tag within your program and that whoever is going to work with it going forward is aware of what’s going on.
Tag aliasing isn’t a complicated concept, but it still surprises PLC programmers who are learning RSLogix 5000 for the first time or simply haven’t encountered this practice in other software packages such as RSLogix 500.
Default Tag Names for Input & Output Modules in RSLogix 5000
Input and Output modules are a critical component of every control system. No matter how small your system is, you’ll have at least a few local input or output cards which will receive feedback from field devices. Adding one of these modules is very simple in RSLogix and can be done by right-clicking the appropriate communications medium (EX: EtherNet, ControlNet, DeviceNet) and selecting “Add New Device…”. A prompt will be presented and allow the user to find the appropriate device from the Allen Bradley catalog. Once it’s selected, you will be prompted to enter the parameters of the module: give it a name, configure options, etc.

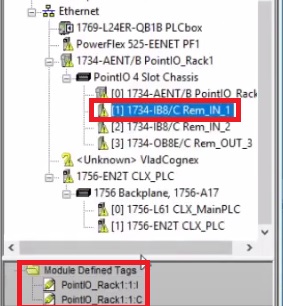
The software will automatically populate the PLC scoped tags with ones necessary for the module we’ve just added. The image above is showing a PointIO rack which has a 1734-IB8 input card. This input card has been created with the title “PointIO_Rack”. Therefore, the tags generated by Studio 5000 for this card are as follows:
- PointIO_Rack1:1:I – All the inputs will be sent here.
- PointIO_Rack1:1:C – All the control bits are sent here.
The tags above will be the ones we will need to alias once we create our references.
Automatic Tag Aliasing
Certain modules will be created with tags which are already aliased to an internal tag within the PLC. This is common with remote input & output modules within families like PointIO & FlexIO. In most cases, local tags will not have such an alias.
Here’s an example of tag aliasing which was done by the PLC for the module we’ve created above. Notice that the tag we saw in the description is in black font while the alias tag is displayed in blue. Note that this can be changed through the options in RSLogix 5000 & Studio 5000.

Creating a Tag Alias in RSLogix 5000
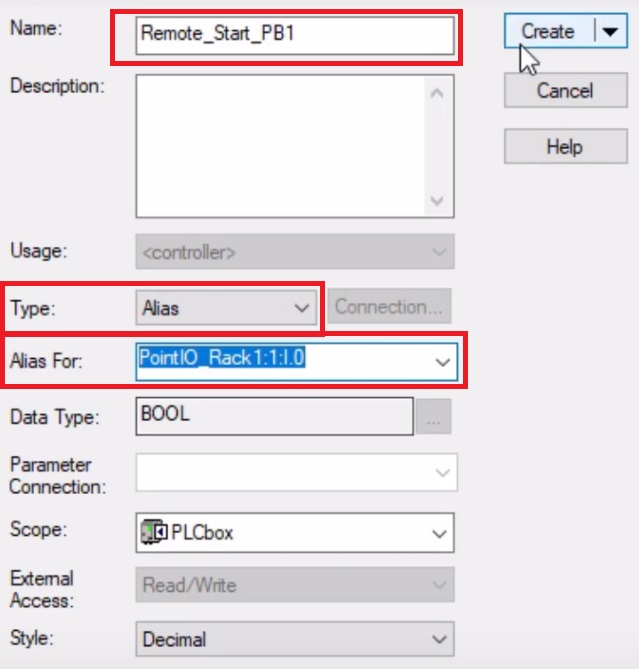
As mentioned before, it’s not very difficult to create a tag alias. Start by right-clicking a new tag name and selecting “Create New Tag…”. Within the prompt which is presented, type in the name for the new tag, select “Alias” within the Type dropdown menu & select or type the name of the tag which your new tag should alias.

The alias will work as a pointer. Wherever you use an alias tag, the base will be modified.
Note that you may alias multiple tag names to a single base tag. This isn’t a recommended practice as it may quickly become confusing what’s happening within the program. Create a habit of aliasing a single tag to a single base tag. This will avoid confusion within the program.
Conclusion
Alias tags have been heavily utilized within RSLogix 5000 programs due to the fact that descriptions are lost if the program needs to be uploaded. In Studio 5000 v21 and higher, most PLCs are capable of storing the comments as well as tag descriptions on the controller. This prevents the loss of tag descriptions during an upload. Although we don’t see a lot of value to alias tags when the descriptions are stored, they still play a big role in many programs found in the field.
Creating an alias tag is simple. Follow the same procedure as you would with a normal tag, but specify the type to be an “alias” and provide a base tag to reference.


