How To Use BOOTP / DHCP Tool Set An IP Address Of a New Rockwell PLC
Introduction
BOOTP / DHCP tool from Rockwell is a necessity when it comes to working with Programmable Logic Controllers (PLCs). However, it is a somewhat controversial tool as it still has a lot of bugs and quirks which frustrate even the most experienced programmers. In this article, we will be exploring the proper use of this tool as well as go over some of the common pitfalls for those who need to set an IP address of their PLC.
For those of you who aren’t familiar with this tool, it’s essentially an add-on for most Rockwell software packages which allows one to set the IP address of a brand new device. This tool will work with most Rockwell hardware as they all run an instance of BOOTP / DHCP out of the box. This process is necessary as it is often the only way to set an IP address in order to connect to the device.
Downloading and Installing BOOTP / DHCP Tool
The Rockwell BOOTP / DHCP tool comes as an addon-on to RSLogix 500, 5000 and Studio 5000 environments. There’s no need to seek a separate download unless it’s missing from your computer.
That being said, there have been many revisions of this software and we highly recommend that you download the latest one. Many of the bugs have been fixed over the years.
Establishing a Connection to the PLC
The main goal of BOOTP is to set the IP address of our device. Before we can do so, we need to configure a few things.
The first step is to select the proper EtherNet adapter through which our PC is connected to the PLC or any other device running BOOTP.
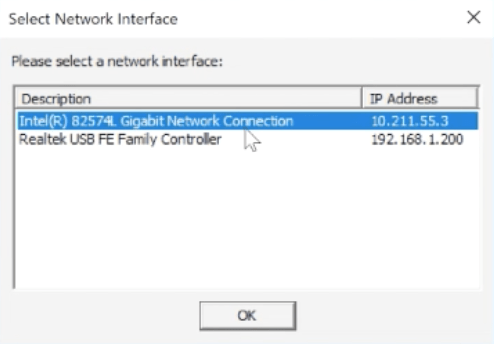
In our case, the correct adapter would be the second one which is set to IP address 192.168.1.200.
The second item we should double check is that the BOOTP tool did take the right card. It has happened to me before that the actual selection was not correct. Here’s a screenshot of the BOOTP network settings which displays the proper card which we had previously selected.
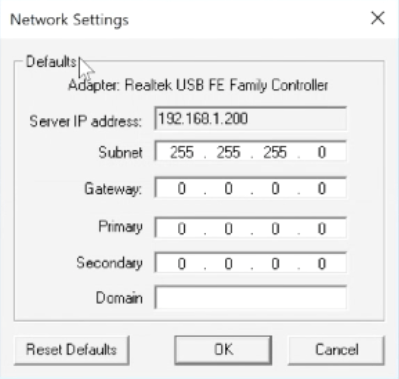
The settings you should be using for your machine’s IP address are the ones you want your end device to have. In other words, make sure that you’re on the same subnet as the final IP address of the target device.
Assigning an IP Address
Our next step is to find the correct device in the list and assign an IP address to it. The tricky part here is making sure that the device we communicate with is the one we are looking for.
TIP: Connect to your device directly. Don’t go through a switch, plant network or any other means of connection. Doing so will make it harder to find the device and can potentially lead to mistakes which bring down production.
If everything goes well, the device should start sending pings to the workstation. BOOTP will display the number of such pings, the type as well as the MAC address of the device which sent them. You’re looking for the MAC address which matches the target device and the Type to be set to BOOTP. See screenshot below which illustrates the device we have on the network.
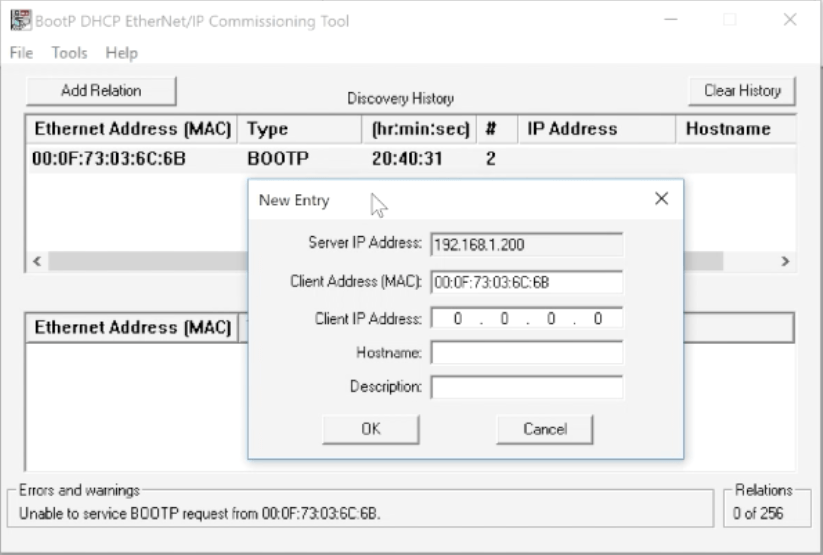
Once the device is found, the user may double-click the device to set an IP address. This window will overlay the original software and have a “Client IP Address” field which you need to set to the desired IP setting.
Retaining the IP Address
BOOTP is the default setting on any new Rockwell device. This setting will reset the IP address of any powered down device and set it back to DHCP. Therefore, it’s important to disable BOOTP once an IP address is given to the device.
The above can be completed in multiple ways. BOOTP allows you to disable the setting, but this doesn’t always work. Therefore, I always verify that it has been disabled through RSLinx.
To disable through BOOTP, you will need to select the device from the menu below the original one and hit the “Disable BOOTP/DHCP” button.
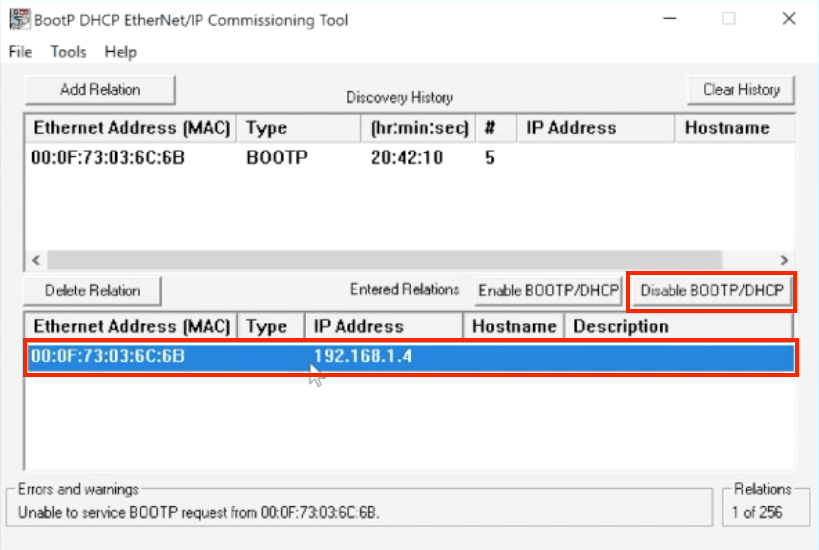
TIP: You will receive a confirmation or a fault at the bottom of the screen. From my experience, this is not very reliable and can be ignored most of the time.
BOOTP / DHCP Setting in RSLinx for New Devices
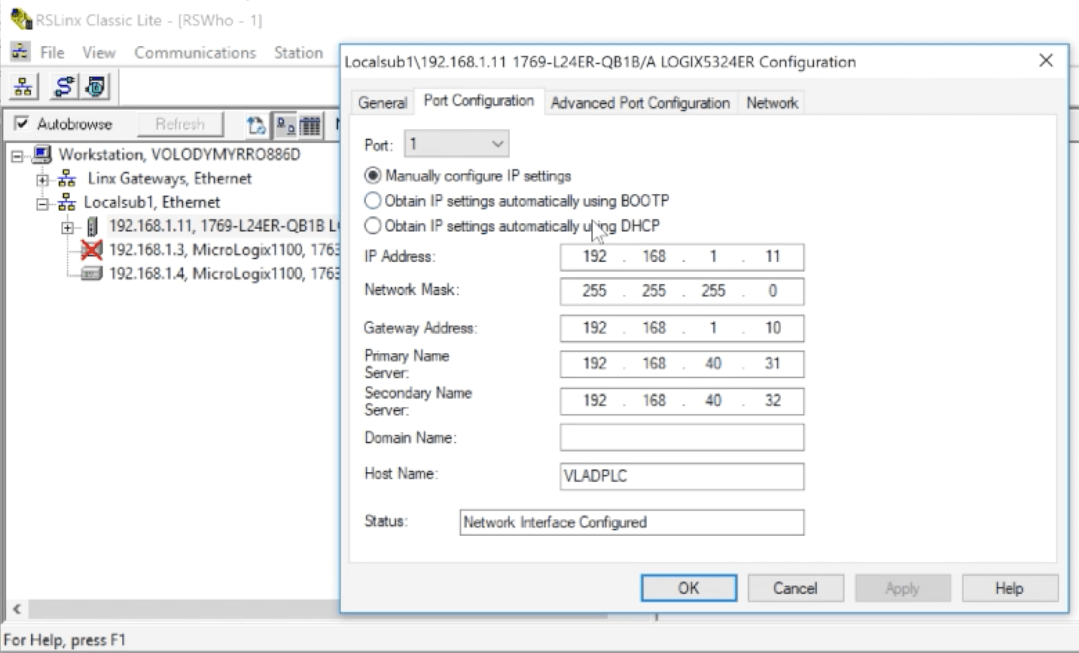
New devices will be easy to verify through RSLinx. In my case, I was able to locate the 1769-L24ER PLC on the network and verify that the BOOTP setting was turned off. You can do so by navigating to the proper path for the device, right-clicking it and viewing the properties. Make sure that the “Manually configure IP settings” is checked and that the right address is in place. Furthermore, you can decide to change the IP address of your device through this interface. I would often go this route if I need to have the device on a local subnet for development and a plant network for deployment.
BOOTP / DHCP Setting in RSLogix 500 (For MicroLogix 1100 PLC)
For the MicroLogix 1100 PLC, you must go through a few extra steps to disable BOOTP.
Here is a screenshot of where these settings are found on this particular device:

Conclusion on Using BOOTP / DHCP Tool
The BOOTP / DHCP Tool from Rockwell Automation certainly has its flaws. That being said, it’s an important tool within the ecosystem and isn’t too complicated to work with. Make sure that you verify that the proper settings took place and you should be in good shape.


